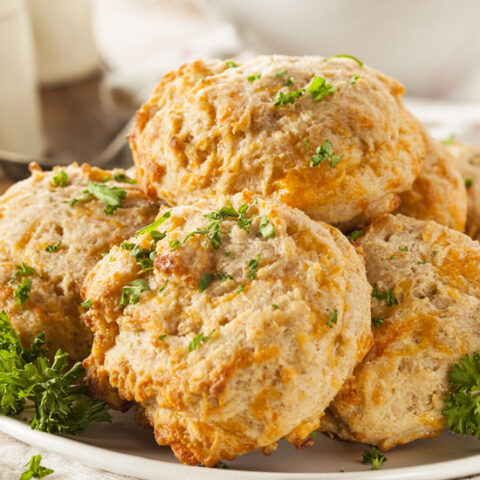
These low sodium cheddar bay biscuits are easy to make from scratch. This low salt side dish needs about 12 minutes of baking time to
Yes, this is a Red Lobster copycat recipe. I think the finished product takes very similar to the original restaurant version, with one major exception: it has significantly less sodium! So you won’t get an exact replica because the original version is quite salty. But the flavor is great and without all that excess salt, the garlic and cheddar really pop!
COMPARED TO THE “REAL” THING
These low sodium cheddar bay biscuits have 32 milligrams of sodium per biscuit. How does that compare to the restaurant version? What about the Red Lobster biscuit mix sold in stores?
According to the nutritional information on Red Lobster’s website. Each Cheddar Bay Biscuit contains 380 mg of sodium. That’s more than 10x the amount of sodium in the low sodium version.
It is a bit tricky to figure out the amount of sodium in the box mix. The nutritional facts say there is a combined 4,000 milligrams of sodium in the dry ingredients (that is a pouch of biscuit mix and a pouch of herb seasoning). But the salt doesn’t end there.
Next, you have to add 1/2 cup of sharp shredded cheddar (~369 mg) and 1/4 cup butter (~327mg if salted, 0 if unsalted). So potentially your sodium content for the mix could be as high as 4,696 mg. The box says it makes 10 biscuits. That means each biscuit is likely to contain around 469 mg of sodium. That’s over 14x the amount of salt in the low sodium recipe.
POTENTIAL ADD-INS
You can make this dish your own by adding a few additional ingredients. Here are a couple of potential items you may wish to add to the mix.
- 1/4 teaspoon of cayenne pepper
- 1 teaspoon granulated sugar
- 1/2 teaspoon of dried parsley
You may also decide you want to top your biscuits with garlic butter. Simply melt 2 tablespoons of unsalted butter, mix in 1/2 teaspoon of garlic powder, and brush the garlic butter onto the biscuits when they come out of the oven.
REHEATING LEFTOVERS
I like to make a double batch and put the extras in the freezer for later. It is super convenient to have these on hand because you can just grab a couple out of the freezer whenever you need them. To store them in the freezer, I prefer to wrap a pair of biscuits tightly in plastic wrap and then place them in an airtight container. They’re best if used within 3 months.
To reheat your frozen cheddar bay biscuits…
- Oven: Wrap them in foil and bake in a 300-degree oven for about 20 minutes.
- Microwave: Wet a paper towel and squeeze the water out well. Wrap it around a biscuit and place it in a microwave-safe container. Set a lid on top but don’t seal it shut. Set the power level to 50% and heat for 2 minutes.
I prefer the microwave oven method because they seem to retain more moisture. I like the texture better using the oven method but there’s a fine line where they go from frozen to dry.
Low Sodium Cheddar Bay Biscuits
A low sodium copycat version of the tasty restaurant biscuit with all the flavor and a fraction of the salt.
Ingredients
- 1 stick of cold unsalted butter, cut into 8 equal pats
- 2 cups of all-purpose flour
- 2 teaspoon of garlic powder
- 1 teaspoon of onion powder
- 1 tablespoon of sodium-free baking powder
- 3/4 cup of milk
- 2 1/2 teaspoons of white distilled vinegar
- 1/2 cup of extra sharp cheddar cheese
Instructions
- Preheat your oven to 400 degrees
- Pour vinegar into milk and set aside.
- Place dry ingredients into a large mixing bowl and gently whisk to combine. You are looking to remove any lumps while mixing together your dry ingredients.
- Toss butter pats into dry ingredients. Using a pastry cutter, cut the butter pieces into the flour until the butter pieces are pea-sized pieces. Your mixture should have coarse crumbs, almost like cornmeal.
- Add shredded cheddar cheese to the bowl.
- Make a well in the flour mixture and slowly add milk into the middle. Knead the dough with your fingers until the milk and dry ingredients come together into a ball of dough. Do not overmix.
- Take the dough out of the bowl and place it onto a lightly floured surface. Roll out to desired thickness. Cut with a small biscuit cutter.
- Re-roll scraps until all the dough is used. You should have about 14 biscuits that are 2.5" in diameter.
- Place biscuits onto a baking sheet that has been lined with parchment paper or lightly sprayed with non-stick cooking spray.
- Bake in a 400-degree oven for 10-12 minutes until biscuits are done and the tops are a very light brown. Once you hit the 10-minute mark, be sure to keep an eye on the biscuits because they can quickly become overcooked on the outside.
Notes
- What's with the milk and vinegar situation at the start of the recipe? Well, you are making a form of buttermilk that will give your biscuits a subtle tang.
- If you don't have a biscuit cutter, you can use a water glass. Just turn the glass upside down, put it into some flour, and use that as your cutter!
- I recommend using extra sharp cheddar cheese for maximum flavor. To keep the sodium low this recipe uses a modest amount of cheese, so you'll want what cheese you use to pack a flavorful punch.
Recommended Products
As an Amazon Associate, I earn from qualifying purchases. For complete information please read the disclosures page (link at the bottom of this page).


Nutrition Information
Yield 14 Serving Size 1 biscuit Amount Per Serving Calories 171Total Fat 10gSaturated Fat 6gTrans Fat 0gUnsaturated Fat 3gCholesterol 26mgSodium 32mgCarbohydrates 17gFiber 1gSugar 2gProtein 4gNutritional information is provided as an estimate. Nutritional content may vary due to several factors such as how much of an ingredient is used vs. how much will actually be eaten, brand differences, and more. To ensure the most accurate nutritional information, the reader should make calculations based on the ingredients actually used, using their own preferred method, or consulting with a licensed nutritional expert. This Website is not intended as a source of nutritional or food safety advice, and its readers assume full responsibility for any decisions made regarding their own health and safety. Nutritional information calculated by Nutritionix
Turn the pop up -sign up for email thing- OFF -super annoying to have that constantly show up. Leaving now and will not be back or stay again if that pop up is still here. Bummer you have some good recipes but I don’t need that crap.
Hi Janey,
I’m sorry for the annoying pop up. That was never the intention. There is a setting that is malfunctioning which is causing it to constantly pop up. It shouldn’t do that – it is designed to only show once and then go away forever. So, I have disabled it until it can be fixed. I appreciate you taking the time to let me know about it!
Mike
I think this is an amazing site! I can’t understand the complainers. That’s what annoys me. The recipes are awesome and for those of us who have to eat low sodium, this site gives us so many options. Thanks for all of your hard work!
Hi Judy! Thanks for the very kind words. I do appreciate your message. I’m not going to hate on the complainers because I think some people might stumble upon a recipe and not realize it is low sodium. If you are used to eating super salty foods (and most people are) then these recipes would be a jolt to someone’s tastebuds. So, I prefer to think of the complainers as people who just got a bit mixed up. Actually, I don’t think of them at all! I focus my energy on people like you!!
Mike